Wednesday, December 7, 2011

Aqua End Table


Somehow I managed to not take a "before" picture. But it was just a dark wood color. The thing I love about this table is that I didn't have to sand it! A friend of my dad's gave it to me and he'd already sanded 3/4 of it. I tried my luck and didn't bother with the rest and it turned out perfect! Gotta love when projects are easy peasy. I used Rustoleum spray paint in Aqua. I love it. This is gonna be a tough one to let go of!


Soon there will be linkys here, but right now American Horror Story is coming on and I must watch!!
EDIT: LINKING UP @
DIY Home Sweet Home, House of Grace, Restore Interiors, Savvy Southern Style,
My Girlish Whims, Miss Mustard Seed, The Shabby Nest

Tuesday, December 6, 2011

TUTORIAL: Paper Flowers


I originally found the tutorial to make these flowers at 52 Mantels. She has an excellent tutorial as well. Probably better than mine because well, this is my first ever! I also apologize in advance for the picture quality. As of right now all I have is a Samsung point and shoot camera. I can fake it up pretty good with furniture, people, animal, everyday shots.. but when you try to take an up close picture, it's not that great. But never the less, hopefully it gets my point across and teaches you how to make an awesome flower!!


You will need lunch sized paper bags, scissors and some twine. The twine is used to secure the paper together in the middle of the flower, so you could use almost anything. Staples, twisty tie, glue, tape, etc. On the ones I made for Thanksgiving, I used staples. But all I had on hand when I made this tutorial was the twine.


The first thing you do is cut down one edge of the bag and then around the entire bottom. You'll be left with one big piece and the bottom will be thrown out. Or if you're crafty you could save all the bottoms. I debated on it, but then threw all mine away. I actually thought they might make good stencils.


After your bottom is cut out, you will then fold the large piece in half. Cut down the fold. Then fold those two pieces in half again. Cut down the folds. You will then have 4 smaller rectangle pieces.


Next, line up all four pieces and accordion fold them like you are making a fan. Then use your twine (or staple, glue, what have you) to bind the pieces together in the middle. It doesn't have to be tied super tight, just strong enough that it won't pull apart easy.


If you have been thinking that your edges aren't even, this step will solve that problem. Take your scissors and round the two ends. This is so that when fluffed out, it will look more like petals of a flower. You could also make the ends pointy, zig zag'd, it all depends on what you want your petals to look like. Use your imagination!


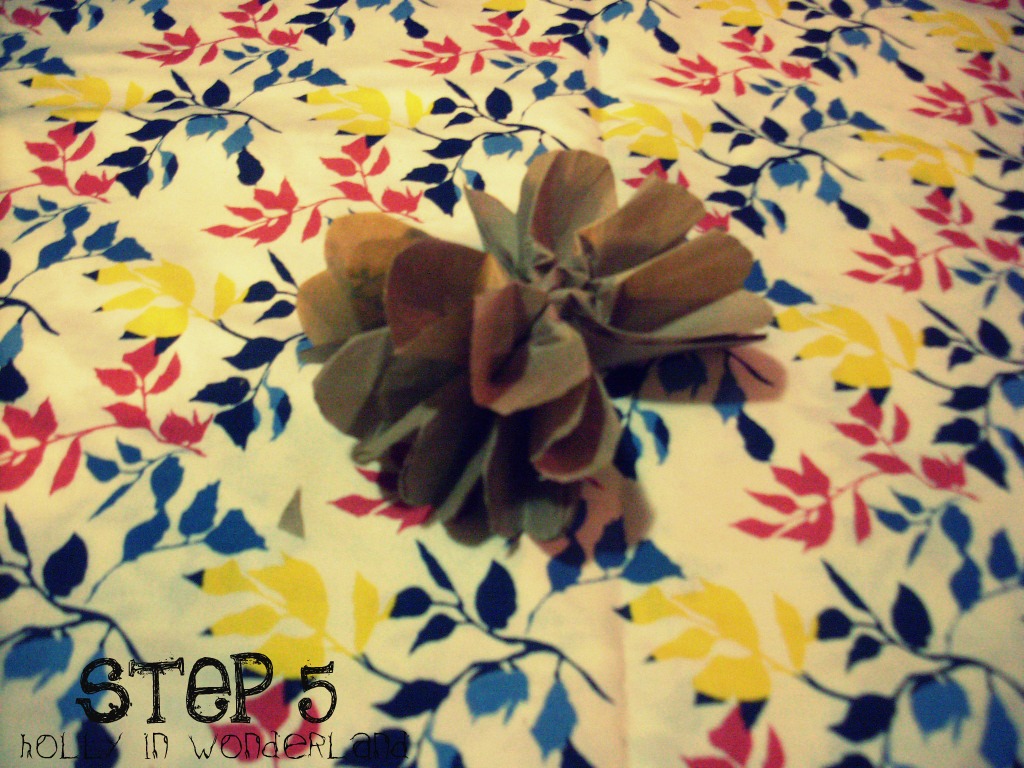
The last step is to start pulling your layers apart. This part was hard to capture in a picture. Just start with the top piece of paper and pull it up and towards the center of the flower. I go around in circles and do the top piece of paper on both sides, then move on to the second and so on. There is no right or wrong way to do this, just figure out what is easiest for you. And yes, you will rip some of the pieces. That's ok! On a few of my flowers, I actually ended up ripping a few spots on purpose just so I could fluff a certain spot to fill in a hole. Just keep going until you get it nice and full looking!


 The final product! A pretty awesome flower! There are so many uses for these too. I made a garland out of mine. (Which you can see here!) But you could also glue some stems on them and use them in a vase. Christmas ornaments! Scatter them throughout your dining table centerpiece. Glue them to a picture frame. Attach magnets and stick to your refrigerator. The possibilities are endless!


Monday, December 5, 2011

Thanksgiving Photos ... A LOT of them!

I know that everyone has been posting Christmas pictures because well, it's that time of year! I have some of those ready to go too, but first I wanted to post some of my Thanksgiving pictures. I finally got my camera and cord back from my dad this morning, so I was able to transfer them to my computer finally. Not much to say, just a photo dump of sorts. The first few are of the decorations. We do Thanksgiving at my parents house (which is next door!) every year and my mom doesn't have many fall things. So I packed up most of my stuff and we decked out her house a little. The last few are of family. The nice thing about living in the south, we ate outside! And actually, I've been running my AC today .. in December. That's crazy! Anyways, on to the pictures..


I actually didn't get my tutorial done the other night because I finished up my end table instead. So right now, I'm sitting down to make a flower. Tutorial will be up tomorrow and my new End Table will be up Wednesday! Then maybe Thursday I'll get around to my Christmas pictures. Wow.. me posting 4 days in a row?! WHAT?! :)


Saturday, December 3, 2011

Paper Flowers

I made these amazing paper flowers to hang up at Thanksgiving. I found a wonderful tutorial for them and I will link her blog in the next post. I also want to make my own tutorial for these. I made about 20 of them for a garland with my mom the day before Thanksgiving, so I didn't take the time to snap pictures. I plan to sit down later tonight and make another for the purpose of showing all of you!

This is just a sweet little preview of them. :)


I've also been working on a new end table, which I plan to finish up tonight as well. Look for that soon too!

Hope you all are having a super weekend!

Wednesday, November 30, 2011

RECIPE: Ding Dong Cake


It's sort of become a "tradition" to have Ding Dong cake at family functions the last year or so. A girl I used to work with made them a lot and would bring them to work for all of us. It's the most delicious cake I have ever eaten, and I usually hate cake. I finally decided to look up the recipe online and make one for myself. Best decision I ever made. It's my dad's favorite cake now! The first 2 pictures are from Thanksgiving. The quality is poor because I used a cell phone. The banner says "Happy Thanksgiving" and I downloaded it from here. (you can always save for next year!) I didn't get any pictures once it was cut into, but I have some from past birthday's and get together's. This particular cake, I got my icing a little to thick and once the chocolate hardened, it was difficult to cut into. But it still tasted yummy!


Ding Dong Cake (take from All Recipes)


  • 1 (18.25 ounce) package devil's food cake mix
  • 1 (3.9 ounce) package instant chocolate pudding mix
  • 4 eggs
  • 1 1/4 cups water
  • 1/2 cup vegetable oil
  • 1/4 cup all-purpose flour
  • 1 cup milk
  • 1/2 cup shortening
  • 1/2 cup butter
  • 1 cup white sugar
  • 2 teaspoons vanilla extract
  • 1 cup chocolate chips
  • 1/4 cup shortening
  • 3 tablespoons light corn syrup
  • 2 1/4 tablespoons water


  1. Preheat oven to 350 degrees F (175 degrees C). Grease and flour a 10 inch springform pan.
  2. In a large bowl, stir together the cake mix and instant pudding. Make a well in the center and pour in the eggs, oil and water. Mix until well blended. Spread evenly into the prepared pan.
  3. Bake for 45 to 50 minutes in the preheated oven, or until a toothpick inserted into the center comes out clean. Cool cake completely on a wire rack before removing from pan.
  4. Slice a 1 inch thick slice off of the top of the cake and set aside. Scoop out the cake for the center of the bottom part to within 1 inch of the sides. Discard or save for another use. To make the filling, whisk together the flour and milk. Cook over medium heat, stirring constantly until thickened. Set aside to cool completely.
  5. Once the flour and milk mixture has cooled, beat the 1/2 cup shortening, butter, sugar and vanilla on high speed until light and fluffy. Add the milk mixture and continue to beat for 4 more minutes. Spoon into the center of the cake and replace the layer sliced from the top.
  6. Combine the chocolate chips, 1/4 cup shortening, corn syrup and water in the top of a double boiler. Heat, stirring frequently until melted and smooth. Pour warm glaze over the top of the cake and smooth over the sides. Refrigerate until serving.


Monday, November 21, 2011

Thankful: 6 Things

It seems appropriate to write up a post about the things that I'm grateful for. Considering it is Thanksgiving and all. Of course I could never put down every single thing that matters to me, but these are definitely the top few.

1. My husband. We have been through some crap over the last (almost) 6 years. But we have always loved each other and that made everything else alright. He works super hard at his 2 jobs to support our little family. He has always been super supportive of what I've wanted to do, although these last couple of months have pushed him. I don't know where I would be if it wasn't for him. So I am definitely thankful that he is in my life for good!


2. My family who is crazy and super embarrassing. But whose isn't, right? They have always been there for me, no matter what. I love them more than anything even tho there are times when I've wanted to kill them. I'm sure that feeling has been mutual though. :) I am also super thankful for my extended family, who can also be crazy and super embarrassing! But I wouldn't trade any of them for the world.

M's family. (mom, dad, sister. niece not pictured)

My family. (everyone, minus a few)

3. My friends. Especially my best friend, Christy. (she has a blog too, but doesn't post much. go encourage her!!) Her and I have really been through some stuff. Some amazing experiences (like falling in love!) and some not so great experiences (like falling out of love.) She lives in Kentucky and I miss her everyday. I can't wait until I can get back up there to visit! But I know that no matter how I screw up or how low I fall, she will always be there for me. And I for her. Secondly, all my old co-workers. I don't get to see them as often as I did when we all worked together, but I consider them some of my best friends. One of those you can say anything at anytime and they just get it. I miss you guys sooo much!!


4. My home. I feel super blessed to have my own home to live in. M and I went through some rough times when we still lived in Michigan. Moving back home has really worked out for us. It's all due to my dad of course since we both blew our credit to pieces. But we live in an amazing place. In the woods, with a pond and horses and it's so peaceful. I really need to learn to enjoy it more.


 5. My furbabies. They are my world and I would feel so lost without them. Zoey in particular. She has been with me for 6 years (longer than M!) and I refuse to think of the day when she will no longer be here. I notice every day that she's getting older. She's slowing down and sometimes she struggles with the simplest of things. I know she's only 6 but her legs have given her some problems in the past and it's evident that her joints are starting to act up. All of my critters see me at my worst, lowest moments and they still love me. Nothing has touched me more than to be crying my eyes out and Hershey comes to lick my face. They know and it is such a precious thing.


6. Having the opportunity to follow my dreams. This one is touchy though. In a recent post I made, I explained why I haven't gone farther in my quest to complete self-employment. I have alot of issues that I need to work on with myself in order to make my dreams come true. But my family supports me and even though I have pushed there limits here lately, they are still on board with me. I'm for sure going to work on this, I may never have another chance to do something so amazing.


I chose 6 because 5 just wasn't enough. :) I hope everyone has a wonderful Thanksgiving. I've spent the whole day crafting and cooking. (posts coming soon!) Back at it in the morning!

Happy Thanksgiving!!

Wednesday, November 9, 2011

Upcoming Projects!


I mentioned in a previous post that I had purchased 3 new furniture pieces to refinish. As of this moment, I have not started any of them. (Shame!) But I'm planning to get started on the desk tomorrow. They are all pretty dirty in these pictures. We don't have a lot of room to store the pieces I work on, so I usually try to just incorporate them into our decor. That way they don't look so out of place or make the house look junky. We pretty much just unloaded these right inside the front door until I could figure out where to put them. We've been climbing around them for almost a week now..


I love this piece. 20$ for the set. It is pretty scratched up but that doesn't matter when you're painting! Also, the front leg on the left side is broken, so we will have to replace it. Probably all four legs so that they'll match. This would be perfect for our little nook of a dining room, so I may end up keeping this one.


I think this piece is my favorite and it was only $5! It's actually a sewing machine stand. The top lifts and folds down the back side to reveal the storage for your machine. But if you aren't a sewer then it would still make a super cute desk with a hidden little secret. I loved the gray color I used on my cedar chest so much, I'm thinking of doing this piece the same color.


Ignore the halloween decorations on top. I have no idea how I will do this little desk but for $5, I couldn't pass it up. I've seen some really cute creations of school desks, so maybe after some searching I'll find some inspiration.

Those green totes store all my halloween decorations. They are the reason I haven't started any of these projects yet. I've gathered all my decorations into a pile next to the boxes but haven't actually packed them up yet. The boxes are mostly blocking my hallway and because of that I can't get any of the furniture down the hall and into my craft room. Until I get my craft room set up for my sewing machine and all my supplies, I've been using it to do my furniture in. So tomorrow my main goal is get rid of the green totes!


This last picture just kind of shows my point of making things blend in. M got this chair from the church he works at. They were going to throw it in the trash! I'm planning on it being my first upholstering experiment. When I work up the guts to tackle it. The nightstand I am painting gray to use in our bedroom. Since we don't have a dining table at the moment, I used the space to make a sort of "sitting area". It stores the two pieces without it looking like storage. I think. Hopefully. :)

The picture of Roxy is just for cuteness. Maybe I'll share her story one day. She's the latest (and last) of our fur babies.

 
Design by Free WordPress Themes | Bloggerized by Lasantha - Premium Blogger Themes | Facebook Themes